How to Prepare for a Property Damage Inspection
A practical homeowner's checklist for getting ready before an inspector arrives — the records to pull, the access to clear, and the questions that keep your scope of loss complete.
By Marshall Smith, IAUA CPAU Certified Insurance Appraiser · Published August 25, 2026 · 7 min read · Filed under Homeowner Tips
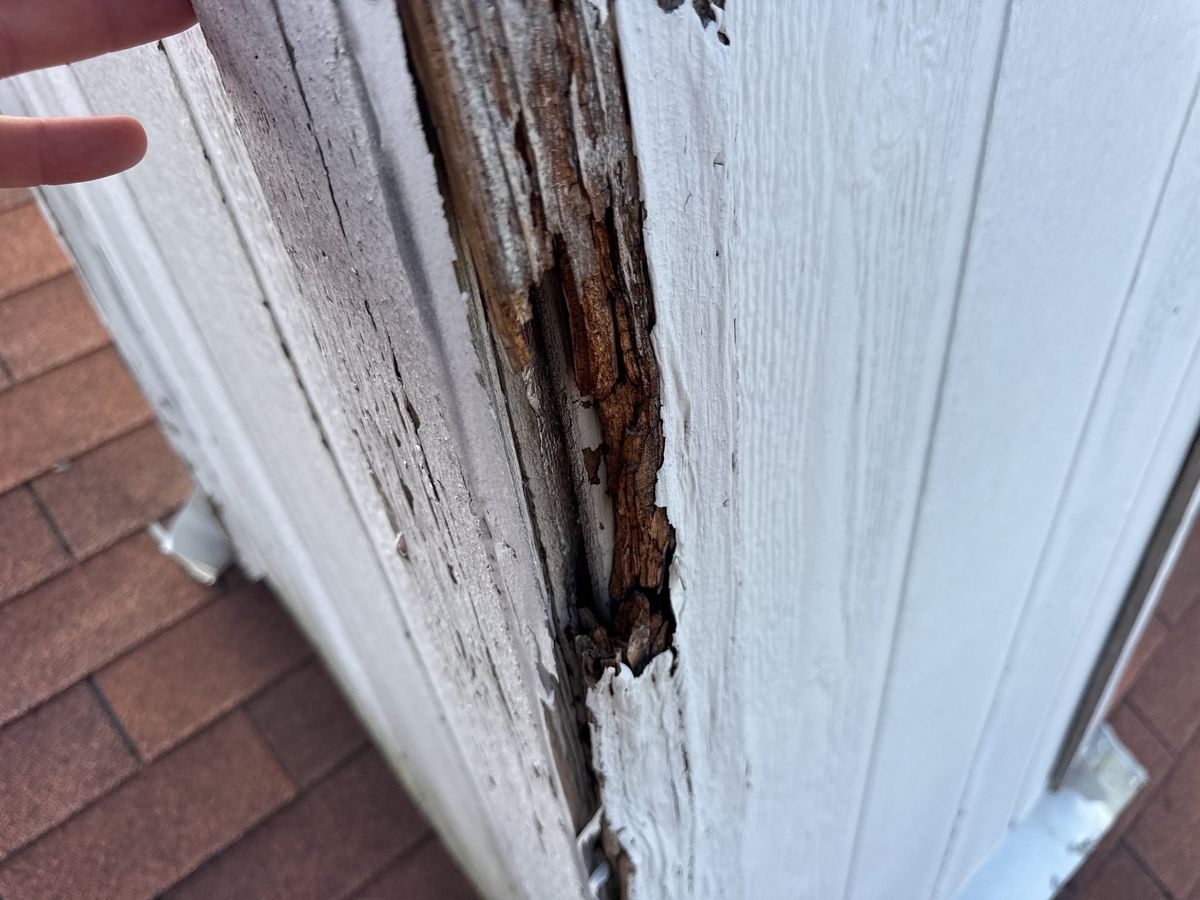
The single most useful thing you can do before a property damage inspection is make every damaged area visible, safe to reach, and backed by your own dated records. An inspector can only document what they can see and confirm, so preparation is really about removing the obstacles — clutter, locked gates, missing paperwork, undated photos — that cause damage to go unrecorded. Do that well, and the resulting report reflects the full extent of the loss rather than a partial view of it.
Everything below is the detail behind that one idea. None of it requires special expertise. It requires an afternoon of organizing before the appointment.
What actually happens when someone inspects your property
A property damage inspection is a structured walk-through in which the inspector examines the building, measures and photographs affected areas, and records observations that will support an estimate or a scope of loss. Depending on the loss, that can mean walking a roof, checking elevations for wind or hail evidence, reading moisture in walls and ceilings, examining interior finishes, and noting how one area of damage connects to another.
Whoever is inspecting — a field adjuster, a contractor, an independent appraiser, or an engineer — is building a factual record. The more complete and accessible that record is, the fewer follow-up visits and disagreements it produces later. When two parties eventually compare estimates, most of the gap between them traces back to something one inspection captured and the other did not. A thorough visit up front is the cheapest way to avoid that gap.
The records worth pulling together first
Have your paperwork in one folder — physical or digital — before the inspector arrives. You do not need to interpret any of it; you need to have it ready so questions can be answered on the spot.
- Your policy, including the declarations page. This shows your coverages, limits, deductible, and any endorsements. Knowing what your policy addresses helps you understand what the inspection is looking for.
- Any prior estimates or reports. If a contractor, roofer, or adjuster has already assessed the damage, having those documents on hand lets the inspector see what has already been observed.
- Photos from before the damage. Real-estate listing photos, family pictures, or a home inventory can establish the pre-loss condition of a roof, room, or finish.
- Maintenance and repair records. Receipts for a recent roof replacement, an HVAC service, or a remodel help distinguish storm damage from ordinary wear.
- The date the damage occurred or was discovered, along with any notes you made at the time.
If your dispute later moves toward the appraisal process, this same folder becomes the backbone of the record. It is worth assembling once and keeping.
Making the damage safe and reachable
An inspector cannot document what they cannot get to. Before the appointment, walk your property and clear the path to every affected area — without doing anything that risks your safety.
- Unlock gates, sheds, and attic accesses, and clear anything blocking them. Restrained pets should be secured away from work areas.
- Move furniture, storage, and belongings away from damaged walls, ceilings, and floors so the surfaces themselves can be examined.
- Point out damage that isn't obvious. A stain that has dried, a soft spot underfoot, a section of fence that was straightened — flag these so they get looked at.
- Do not climb the roof or enter unsafe structures yourself. For roof and elevation damage, an aerial view is often the safer and more complete option; that is one reason drone inspections for insurance claims have become a standard tool for documenting steep or storm-damaged roofs without putting anyone at risk.
If you have made emergency repairs to prevent further loss — tarping a roof, boarding a window, extracting standing water — that is appropriate and often required by your policy. Just keep the receipts and the before-photos so the original damage remains part of the record even after it is covered up.
The photos and notes to have in hand
Your own documentation does not replace the inspection, but it fills the gaps between visits and preserves conditions that change over time. Aim for photos that are clear, well-lit, and time-stamped by your device or camera.
- Wide shots and close-ups of every damaged area, so the location and the detail are both visible.
- Something for scale in close-up photos — a coin, a tape measure, a hand — so the size of a dent, crack, or hail mark reads accurately.
- Progression photos where damage is evolving, such as a water stain spreading day to day or a crack lengthening.
- A short written log: what you noticed, when, and any weather or event you associate with it.
Keep the originals. Cropping, filtering, or resaving images can strip the metadata that establishes when a photo was taken, and that metadata is part of what makes your record credible. If you're documenting water intrusion, the sequence and timing of your photos matter as much as the images themselves — the approach we outline in our guide to documenting water damage for an insurance claim applies to nearly any peril.
What to ask while the inspector is there
The inspection is a good moment to understand what is being recorded and what happens next. Reasonable questions include:
- What areas are you inspecting, and how? Confirm the roof, all four elevations, interiors, and any detached structures are on the list.
- Are you taking measurements and photographs of each affected area? This helps ensure the scope reflects the full extent, not a sample.
- Is there anything you'd like me to point out or provide? Offer your prior estimates and pre-loss photos here.
- What are the next steps, and roughly when should I expect the report?
Walk along if you can do so safely. You know the property and its history better than anyone, and small facts — that the fence was replaced last spring, that this ceiling never leaked before the storm — often clarify what the inspector is seeing.
After the inspection: reading the report
Once the inspection is complete, the observations become a written report and, usually, a line-item estimate or scope of loss. Read it against what you saw during the visit. Ask yourself:
- Is every damaged area you identified actually listed?
- Do the measurements and quantities match the building?
- Are related items included — not just the roof shingles, for instance, but flashing, underlayment, and any code-required upgrades that a repair would trigger?
If something you know was inspected doesn't appear in the report, that is worth raising early. Gaps are far easier to resolve while the memory of the visit is fresh than months later. If you want to understand how a line-item estimate is built and priced, our overview of the tools and methods behind these documents is on the services page.
Why a careful inspection shapes an accurate scope of loss
The point of all this preparation is a scope of loss that both sides can trust. The scope is the itemized description of what was damaged and what it takes to repair or replace it. When it is built from a complete, well-documented inspection, there is less to disagree about — and when a disagreement does arise over the amount of loss, the appraisal clause in your policy gives both the policyholder and the carrier a fair, structured way to resolve it, using independent appraisers and, if needed, a neutral umpire.
Appraisal decides the amount of loss, not questions of coverage. But it works best when the underlying documentation is thorough, which is why the effort you put into a single inspection pays off well beyond that afternoon. A record that is complete from the start rarely needs to be rebuilt under pressure.
A few questions homeowners still ask
Should I be present for the inspection? Yes, when you can. Being there lets you point out damage, answer questions about the property's history, and understand what is being recorded.
Can I make repairs before the inspection? Emergency repairs that prevent further damage are appropriate and often required — just document the original damage first with photos and keep your receipts. Hold off on permanent repairs until the loss has been fully inspected.
What if I disagree with the report? Raise specific, factual points early, supported by your own photos and records. If the disagreement is about the amount of loss and it persists, the appraisal process may be the path forward. You can review common questions on our FAQ page.
If you'd like an independent, evidence-based look at your property loss, Marshall Services offers a free consultation. Call 972-322-0752 or start with our client submission form, and we'll help you understand your options as a neutral, certified appraiser and umpire.